
This is a painting of a character I created called Tweetor. Tweeting is all he craze these days and I decided to give tweeting a superhero. This led to the birth of Tweetor.
This painting was created using Procreate for iPad. Vignette was added to the final result using Snapseed for iPad.
Wednesday, July 25, 2012
Tweetor (iPad painting)
Tuesday, April 17, 2012
Spider-Man Fan Art using iPad and Procreate app
This is a painting of Spider-Man I made using only my iPad and the superb Procreate app.
Tuesday, March 13, 2012
new iPad (3rd Generation) & Using iPad to create rather than consume
When the iPad was first released back in April of 2010, it was primarily a device of consumption. You could read ebooks, watch movies, surf the web, listen to music and play games on it. That was all good and well but for artists and photographers, it was mostly used to showcase their work as a portfolio.
After the release of the second iteration of the iPad in March of 2011, app developers started to grasp the true nature of this great device and were introducing more and more apps that allowed users to create projects of different nature right on their devices; be it making music using Garageband, create stunning art using Procreate and even organize and edit RAW format photos using Filterstorm Pro 2.
I saw this walkthrough of Filterstorm Pro 2, made by Tai Shimizu, and was amazed at what could be achieved on the iPad.
I had been on the fence about getting an iPad for some time but once I saw this demo, I was sold. I just preorederd my new Third Generation iPad last week when it was announced by Apple on March 7th.
Here is a video from Apple showcasing the new iPad and it's features:
With a great screen resolution of 2048 x 1536 (that's more resolution than an HDTV) and a quad core Graphics processor, this will be a great device to compliment any creative mind.
Photo editing will be amazing on this as-well as drawing and painting using Procreate and other apps (more on Procreate in a future post).
I can't wait to get my hands on the new iPad. I will post an unboxing as-well as a review of the device and different creative apps that made me decide to purchase the iPad instead of another tablet.
Stay Tuned!
Tuesday, December 13, 2011
Cinemagraphy: A new approach to photography
I was trying to find something new to pursue in terms of photography when one of my friends suggested a new technique in photography called "cinemagraphy".
I was curious to know what it was and what I learned blew me away!!
Here is a link to a website that inspired me to try out cinemagraphy:
What is cinemagraphy?
Cinemagraphy is a technique that allows you to introduce subtle movement to your photograph.
I think this will revolutionize the way photographs appear online.
On this link: http://cinemagraphs.com/food/ , we can see examples of different food items shot with this technique.
I saw some tutorials that were using Photoshop but I will try this with GIMP and post the results on this post. The images are in GIF format. They look great on a Web Browser from a desktop or a laptop but when loading these images on my iPhone, it tends to show the movement with slight frame skip.
In the meantime, visit the link above which gives you an idea of what can be achieved with cinemagraphy; I'm sure you all will be inspired.
Wednesday, November 30, 2011
How to add copyright to images using RawTherapee
In my last post, i reviewed the amazing software Photivo which lets you edit Raw files and export to Tiff, Jpeg and other formats.
What Photivo lacks though is a way to edit metadata of the exported image file.
You would want to edit this metadata to add copyright info to the image file.
To achieve this, we can use another open source software called Raw Therapee.
Raw Therapee can do much more than just edit metadata as it is yet another alternative to Lightroom.
Personally, I was not too pleased with this software as an editor. Every time i had finished editing an image, the exported result would always differ from what the Raw Therappe interface showed me (image would be darker sometimes even too dark).
For now, I use it exclusively to add my copyright info. I just saw that they updated the Mac version of this software yesterday so I might update and see if it's better now.
I will try and post a review of Raw Therapee soon.
Now let's get on with the copyright tutorial:
- Once in Raw Therapee, open the image file you just exported from Photivo (be sure to export to TIFF 16bit in Photivo).
 - On the right side of the screen you can see different develop options.
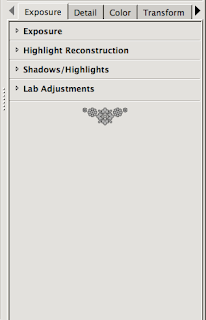
- Click on the right arrow to cycle through the options until you reach the Metadata panel.

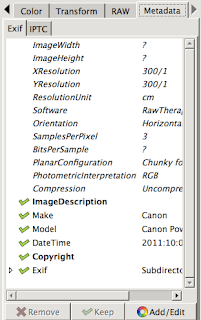
- You will see the copyright field at the bottom. Double clicking it will let you edit the field and add you copyright info.
 TIP:
TIP:
To add the copyright symbol before your name:
On Mac: Option/Alt key + G.
On Windows: Alt+0169 (keypad only)

There you have it, all you have to do next is export this TIFF image file to any format from Raw Therapee and your copyright info will be embedded.
What Photivo lacks though is a way to edit metadata of the exported image file.
You would want to edit this metadata to add copyright info to the image file.
To achieve this, we can use another open source software called Raw Therapee.
Raw Therapee can do much more than just edit metadata as it is yet another alternative to Lightroom.
Personally, I was not too pleased with this software as an editor. Every time i had finished editing an image, the exported result would always differ from what the Raw Therappe interface showed me (image would be darker sometimes even too dark).
For now, I use it exclusively to add my copyright info. I just saw that they updated the Mac version of this software yesterday so I might update and see if it's better now.
I will try and post a review of Raw Therapee soon.
Now let's get on with the copyright tutorial:
- Once in Raw Therapee, open the image file you just exported from Photivo (be sure to export to TIFF 16bit in Photivo).


- Click on the right arrow to cycle through the options until you reach the Metadata panel.

To add the copyright symbol before your name:
On Mac: Option/Alt key + G.
On Windows: Alt+0169 (keypad only)

There you have it, all you have to do next is export this TIFF image file to any format from Raw Therapee and your copyright info will be embedded.
Tuesday, November 29, 2011
Photivo (Mac version) review (open source alternative to Adobe Lightroom)
I had been searching for a free alternative to the much beloved Adobe Lightroom software for a while now. I had tried the Lightroom 3 Demo and instantly got hooked to all it had to offer in terms of organizing,editing and developing RAW image files.
One thing that made me cringe was the price: at 300$ for the full version, it was not too inviting for someone who just wants to showcase images online. I can understand the research and development has a lot to do behind the price but it was just not for me.
I decided to look to open source applications on MAC that would allow me to output RAW images as close as possible to Lightroom without much fuss.I stumbled across this great software a few weeks ago and was relly surprised at what it could accomplish.
That software was Photivo. It is available for Windows, Mac and Linux (although Windows version gets more updates). The latest Mac version is from September 2011. The Windows version, as of writing, was updated on November 28 2011.
In the beginning, I felt a little lost with the user interface provided. it was a completely different beast compared to Lightroom.
The left side of the screen is where all of the main develop tools are located (exposure, contrast,saturation..etc).
The right side displays your RAW image once opened. there is even a histogram to help you just like most RAW editors.

At first, it is easy to get overwhelmed with this new interface but once you learn to use it, it makes a lot of sense. Personally, I find the interface to be quite clean and simple.
There is a search bar on the top of the develop section. Here, you can type anything pertaining to image editing and without even having to navigate countless menus, you will be provided with the tool you requested.

For example, if I want to convert the city skyline image to black and white, I start typing "black" in the search bar and right away it will give me the tool i need. All I have to do is turn up the opacity value from 0 to 1 using the slider.


There are many more actions that can be accessed either from the navigation menu or the search bar but I suggest you explore them once you have installed this great software. (for more in-depth information on different features, please read the online manual).
In conclusion, I recommend this software to all photographers who do not have the budget to purchase the full Lightroom license and who do not want to sacrifice quality because even though this software is open source, it has the potential of outputting final images worthy of top image editors.
All the pictures found on this blog are edited using this great Software.
Here is a link to the official Flickr group for Photivo where you can find many different images edited using this software.
If you have any questions regarding Photivo, please leave a comment below and I will be happy to respond.
Enjoy this software and looking forward to seeing different pictures from you guys. You can post the link to an image you edited using Photivo in the comments section below.
One thing that made me cringe was the price: at 300$ for the full version, it was not too inviting for someone who just wants to showcase images online. I can understand the research and development has a lot to do behind the price but it was just not for me.
I decided to look to open source applications on MAC that would allow me to output RAW images as close as possible to Lightroom without much fuss.I stumbled across this great software a few weeks ago and was relly surprised at what it could accomplish.
That software was Photivo. It is available for Windows, Mac and Linux (although Windows version gets more updates). The latest Mac version is from September 2011. The Windows version, as of writing, was updated on November 28 2011.
In the beginning, I felt a little lost with the user interface provided. it was a completely different beast compared to Lightroom.
The right side displays your RAW image once opened. there is even a histogram to help you just like most RAW editors.

At first, it is easy to get overwhelmed with this new interface but once you learn to use it, it makes a lot of sense. Personally, I find the interface to be quite clean and simple.
There is a search bar on the top of the develop section. Here, you can type anything pertaining to image editing and without even having to navigate countless menus, you will be provided with the tool you requested.
For example, if I want to convert the city skyline image to black and white, I start typing "black" in the search bar and right away it will give me the tool i need. All I have to do is turn up the opacity value from 0 to 1 using the slider.


There are many more actions that can be accessed either from the navigation menu or the search bar but I suggest you explore them once you have installed this great software. (for more in-depth information on different features, please read the online manual).
In conclusion, I recommend this software to all photographers who do not have the budget to purchase the full Lightroom license and who do not want to sacrifice quality because even though this software is open source, it has the potential of outputting final images worthy of top image editors.
All the pictures found on this blog are edited using this great Software.
Here is a link to the official Flickr group for Photivo where you can find many different images edited using this software.
If you have any questions regarding Photivo, please leave a comment below and I will be happy to respond.
Enjoy this software and looking forward to seeing different pictures from you guys. You can post the link to an image you edited using Photivo in the comments section below.
Montreal Old Port Photo Shoot (Oct 8 2011)
Here are some pictures from a photo shoot i had done back in october.
I shall be adding more shoots in the coming days.

This is the first shot of the shoot. the rest of the pictures in this post will not necessarily be in chronological order but because the sign on this building says "Bienvenue" (Welcome in French), I decided that it made sense to put this as a "welcome" to the post.
 This is one of my favorite shots of the day. It's the Montreal city skyline as seen from the banks of the old port. I wish the river would have been still so i could have a reflection of the city in the water but that day, it was really windy.
I shall be adding more shoots in the coming days.
This is the first shot of the shoot. the rest of the pictures in this post will not necessarily be in chronological order but because the sign on this building says "Bienvenue" (Welcome in French), I decided that it made sense to put this as a "welcome" to the post.

Subscribe to:
Posts (Atom)